Table of Contents
- Introduction
- Key Takeaways
- Pre-requisites
- Strategy Overview
- Continuous Integration System
- Continuous Delivery System
- Dockerfile
- Index.html
- pom.xml
- Jenkins Job Executor Shell
- Kubernetes Manifests
- Steps to Set Up the Pipeline
- Deep Diving Into the Pipeline
- Some Important Points to Remember:
- Conclusion
Introduction
Kubernetes is now the de-facto standard for container orchestration. With more and more organizations adopting Kubernetes, it is essential that we get our fundamental ops-infra in place before any migration. In this post, we will learn about leveraging Jenkins and Spinnaker to roll out new versions of your application across different Kubernetes clusters.
Key Takeaways
- Kubernetes is the standard for container orchestration, requiring a solid ops-infrastructure before migration.
- MetricFire offers robust monitoring for Kubernetes, detecting issues early on.
- Jenkins and Spinnaker enable smooth application rollout across multiple Kubernetes clusters.
- GitHub and Jenkins provide a CI system for building, testing, and scanning code.
- Spinnaker facilitates automatic deployments to staging and supervised deployments to production in Kubernetes.
Pre-requisites
- Running Kubernetes Cluster with at least 3 nodes (GKE is used for the purpose of this blog)
- A Spinnaker set-up with Jenkins CI enabled.
- Github webhooks enabled for Jenkins jobs.
- Basic knowledge about CI/CD and various Kubernetes resources. You can go through a refresher here.
Strategy Overview
- Github + Jenkins: Continuous Integration System which
a. Checks out code
b. Builds the source code and runs tests
c. Builds the docker image and pushes to the registry.
d. We can optionally scan docker images of any vulnerabilities before pushing it to docker hub or any other registry - Docker hub: Registry to store docker images.
a. You can also use GCR or ECR. Make sure respective pull secrets are configured - Spinnaker: Continuous Delivery System to enable automatic deployments to Staging environment and supervised deployment to Production.
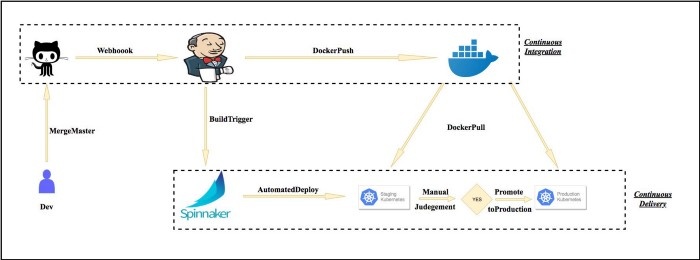
Continuous Integration System
Although this post is about the CD system using Spinnaker. I want to briefly go over the CI pipeline so that the bigger picture is clear.
- Whenever there is a push in the master branch, a Jenkins job is triggered via Github webhook. The commit message for the push should include the updated version of the application and whether it is Kubernetes Deploy action or Patch action.
- The Jenkins job checks out the repo, builds code and builds the docker image according to Dockerfile and pushes it to Docker hub. This job should be configured to somehow figure out the tag for the docker image.
This tag can be the application version which could be either relayed in the github webhook or parsed using a configuration file in the source code. In this case we will be parsing the pom.xml file to figure out the tag for the docker image. - The Jenkins job will then trigger a Spinnaker pipeline and send the trigger.properties file as a build artifact. This properties file contains very crucial info which is consumed by Spinnaker and will be explained later in this post. The artifacts file looks something like this:
TAG=1.7-SNAPSHOT
ACTION=DEPLOY
Continuous Delivery System
This is the most important section of this blog. Spinnaker offers a ton of options for Kubernetes deployments. You can either consume manifests from GCS or S3 bucket or you can provide manifest as text in the pipeline itself.
Consuming manifests from GCS or S3 buckets includes more moving parts and since this is an introductory blog, it is beyond its scope right now. However, with that being said, I extensively use that approach and it is best in scenarios where you need to deploy a large number of micro-services running in Kubernetes - this is because such pipelines are highly templatized and re-usable.
Today, we will deploy a sample Nginx Service which reads the app version from a pom.xml file and renders it on the browser. Application code (index.html) and Dockerfile for the application is below:
Dockerfile
This is a very simple dockerfile for our application. All it does is create a new docker image for every version of the app and the application version is displayed when the service is accessed.
FROM vaibhavthakur/nginx-vts:v1.0
COPY index.html /usr/share/nginx/html/index.html
Index.html
<head>
<title>Welcome to nginx!</title>
<style>
    body {
        width: 35em;
        margin: 0 auto;
        font-family: Tahoma, Verdana, Arial, sans-serif;
    }
</style>
</head>
<body>
<h1>Welcome to nginx!</h1>
<p>The current build version is VER</p>
<p>If you see this page, the nginx web server is successfully installed and
working. Further configuration is required.</p>

<p>For online documentation and support please refer to
<a href="http://nginx.org/">nginx.org</a>.<br/>
Commercial support is available at
<a href="http://nginx.com/">nginx.com</a>.</p>

<p><em>Thank you for using nginx.</em></p>
</body>
</html>
pom.xml
<?xml version="1.0" encoding="UTF-8"?>
<project xmlns="http://maven.apache.org/POM/4.0.0"
         xmlns:xsi="http://www.w3.org/2001/XMLSchema-instance"
         xsi:schemaLocation="http://maven.apache.org/POM/4.0.0 http://maven.apache.org/xsd/maven-4.0.0.xsd">
  <modelVersion>1.0.0</modelVersion>

  <groupId>gageot.net</groupId>
  <artifactId>helloworld</artifactId>
  <version>1.1-SNAPSHOT</version>
  <packaging>jar</packaging>

  <prerequisites>
    <maven>3</maven>
  </prerequisites>

  <properties>
    <project.build.sourceEncoding>UTF-8</project.build.sourceEncoding>
    <maven.compiler.source>1.8</maven.compiler.source>
    <maven.compiler.target>1.8</maven.compiler.target>
  </properties>

  <build>
    <finalName>hello</finalName>
    <plugins>
      <plugin>
        <artifactId>maven-jar-plugin</artifactId>
        <version>2.4</version>
        <configuration>
          <archive>
            <manifest>
              <addClasspath>true</addClasspath>
              <classpathPrefix>dependency</classpathPrefix>
              <mainClass>net.gageot.MainHello</mainClass>
            </manifest>
          </archive>
        </configuration>
      </plugin>
    </plugins>
  </build>

  <dependencies>
    <dependency>
      <groupId>net.code-story</groupId>
      <artifactId>http</artifactId>
      <version>2.5</version>
    </dependency>
    <dependency>
      <groupId>org.webjars</groupId>
      <artifactId>bootstrap</artifactId>
      <version>3.1.1-1</version>
    </dependency>
  </dependencies>
</project>
The part where index.html is updated can be seen in the gist below (It is basically what the Jenkins job does).
Jenkins Job Executor Shell
The Jenkins job does the following:
- Check’s out code and decide whether or not the pipeline should be triggered. It will only trigger the build for master branch
- Parse pom.xml and get the new application version
- Updates index.html to reflect the new application version
- Builds docker image with the new index.html, tags it appropriately and pushes it to docker hub
- Generates a properties file which will be consumed by Spinnaker. As soon as this build finishes successfully, a spinnaker pipeline gets triggered.
#!/bin/bash
#Author: Vaibhav Thakur

#Checking whether commit was in master of not.
if_master=`echo $payload | jq '.ref' | grep master`
if [ $? -eq 1 ]; then
	echo "Pipeline should not be triggered"
    exit 2
fi

#Getting tag from pom.xml
TAG=`grep SNAPSHOT pom.xml | sed 's|[<,>,/,version ]||g'`
echo $TAG

#Getting action from commit message
ACTION=$(echo $payload | jq -r '.commits[0].message' | cut -d',' -f2)

#Updating index.html
sed -i -- "s/VER/${TAG}/g" app/index.html

#Pushing to dockerhub
docker build -t vaibhavthakur/nginx-demo:$TAG .
docker push vaibhavthakur/nginx-demo:$TAG

echo TAG=${TAG} > trigger.properties
echo ACTION=${ACTION} >> trigger.properties
Kubernetes Manifests
apiVersion: v1
kind: Namespace
metadata:
  name: nginx
---
apiVersion: extensions/v1beta1
kind: Deployment
metadata:
  namespace: nginx
  name: nginx-deployment
spec:
  replicas: 1
  template:
    metadata:
      annotations:
        prometheus.io/path: "/status/format/prometheus"
        prometheus.io/scrape: "true"
        prometheus.io/port: "80"
      labels:
        app: nginx-server
    spec:
      affinity:
        podAntiAffinity:
          preferredDuringSchedulingIgnoredDuringExecution:
          - weight: 100
            podAffinityTerm:
              labelSelector:
                matchExpressions:
                - key: app
                  operator: In
                  values:
                  - nginx-server
              topologyKey: kubernetes.io/hostname
      containers:
      - name: nginx-demo
        image: vaibhavthakur/nginx-demo:1.0-SNAPSHOT
        imagePullPolicy: Always
        resources:
          limits:
            cpu: 2500m
          requests:
            cpu: 2000m
        ports:
        - containerPort: 80
          name: http
---
apiVersion: v1
kind: Service
metadata:
  namespace: nginx
  name: nginx-service
  annotations:
    cloud.google.com/load-balancer-type: Internal
spec:
  ports:
  - port: 80
    targetPort: 80
    name: http
  selector:
    app: nginx-server
  type: LoadBalancer
In the manifest above we create the following:
- Namespace to deploy our application
- Deployment to which new releases will be pushed
- Service for accessing the application from outside the cluster
Steps to Set Up the Pipeline
- Create a new application under the applications tab and add your name and email to it. Rest all fields can be left blank.
- Create a new project under Spinnaker and add your application under it. Also, you can add your staging and production kubernetes cluster under it.
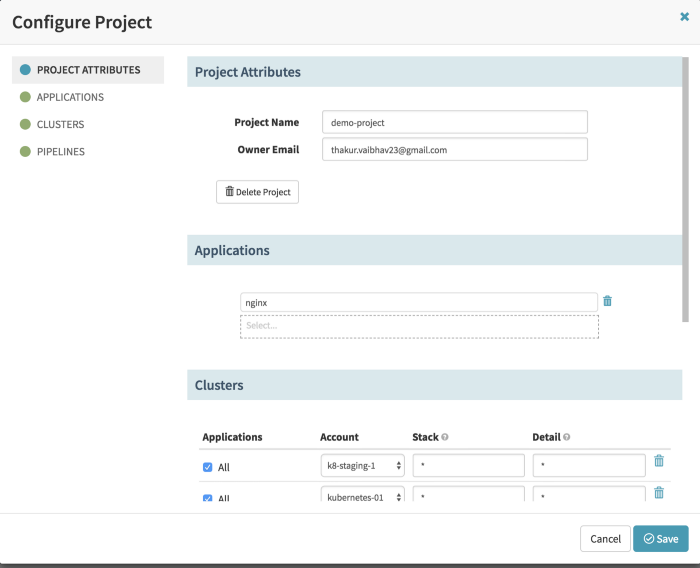
We recommend grouping multiple applications into a single project. This grouping can be based on different teams. It varies from organization to organization. However, clusters can of course be shared across different projects.
Spinnaker connects to different kubernetes clusters using RBAC based authentication and that is the recommended way to do it. We will go over the entire spinnaker set-up and connect various kubernetes clusters to it in an upcoming blog. Stay tuned :)
- Now, under the application section add your pipeline. Make sure the Trigger stage is set to Jenkins and you are consuming the artifacts appropriately. You can use this pipeline json. (Don’t forget to modify it according to your credentials and endpoints.)
{
  "appConfig": {},
  "expectedArtifacts": [],
  "keepWaitingPipelines": false,
  "lastModifiedBy": "thakur.vaibhav23@gmail.com",
  "limitConcurrent": false,
  "parameterConfig": [],
  "stages": [
    {
      "account": "k8-staging-1",
      "cloudProvider": "kubernetes",
      "manifestArtifactId": "d065b01d-0838-4d09-a4b8-53387a5ce6bf",
      "manifests": [
        {
          "apiVersion": "v1",
          "kind": "Namespace",
          "metadata": {
            "name": "nginx"
          }
        },
        {
          "apiVersion": "extensions/v1beta1",
          "kind": "Deployment",
          "metadata": {
            "name": "nginx-deployment",
            "namespace": "nginx"
          },
          "spec": {
            "replicas": 1,
            "template": {
              "metadata": {
                "annotations": {
                  "prometheus.io/path": "/status/format/prometheus",
                  "prometheus.io/port": "80",
                  "prometheus.io/scrape": "true"
                },
                "labels": {
                  "app": "nginx-server"
                }
              },
              "spec": {
                "affinity": {
                  "podAntiAffinity": {
                    "preferredDuringSchedulingIgnoredDuringExecution": [
                      {
                        "podAffinityTerm": {
                          "labelSelector": {
                            "matchExpressions": [
                              {
                                "key": "app",
                                "operator": "In",
                                "values": [
                                  "nginx-server"
                                ]
                              }
                            ]
                          },
                          "topologyKey": "kubernetes.io/hostname"
                        },
                        "weight": 100
                      }
                    ]
                  }
                },
                "containers": [
                  {
                    "image": "vaibhavthakur/nginx-demo:${trigger.properties['TAG']}",
                    "imagePullPolicy": "Always",
                    "name": "nginx-demo",
                    "ports": [
                      {
                        "containerPort": 80,
                        "name": "http"
                      }
                    ],
                    "resources": {
                      "limits": {
                        "cpu": "2500m"
                      },
                      "requests": {
                        "cpu": "2000m"
                      }
                    }
                  }
                ]
              }
            }
          }
        }
      ],
      "moniker": {
        "app": "nginx"
      },
      "name": "Deploy (Manifest)",
      "refId": "2",
      "relationships": {
        "loadBalancers": [],
        "securityGroups": []
      },
      "requisiteStageRefIds": [],
      "source": "text",
      "stageEnabled": {
        "expression": "\"${trigger.properties['ACTION']}\" == \"DEPLOY\"",
        "type": "expression"
      },
      "type": "deployManifest"
    },
    {
      "account": "k8-staging-1",
      "cloudProvider": "kubernetes",
      "kind": "deployment",
      "location": "nginx",
      "manifestArtifactId": "d065b01d-0838-4d09-a4b8-53387a5ce6bf",
      "manifestName": "deployment nginx-deployment",
      "name": "Patch (Manifest)",
      "options": {
        "mergeStrategy": "strategic",
        "record": true
      },
      "patchBody": {
        "spec": {
          "template": {
            "spec": {
              "containers": [
                {
                  "image": "vaibhavthakur/nginx-demo:${trigger.properties['TAG']}",
                  "name": "nginx-demo"
                }
              ]
            }
          }
        }
      },
      "refId": "3",
      "requiredArtifactIds": [],
      "requisiteStageRefIds": [],
      "source": "text",
      "stageEnabled": {
        "expression": "\"${trigger.properties['ACTION']}\" == \"PATCH\"",
        "type": "expression"
      },
      "type": "patchManifest"
    },
    {
      "failPipeline": true,
      "instructions": "Please approve if Staging looks good",
      "judgmentInputs": [],
      "name": "Manual Judgment",
      "notifications": [],
      "refId": "4",
      "requisiteStageRefIds": [
        "2"
      ],
      "stageEnabled": {
        "expression": "\"${trigger.properties['ACTION']}\" == \"DEPLOY\"",
        "type": "expression"
      },
      "type": "manualJudgment"
    },
    {
      "account": "kubernetes-01",
      "cloudProvider": "kubernetes",
      "manifests": [
        {
          "apiVersion": "v1",
          "kind": "Namespace",
          "metadata": {
            "name": "nginx"
          }
        },
        {
          "apiVersion": "extensions/v1beta1",
          "kind": "Deployment",
          "metadata": {
            "name": "nginx-deployment",
            "namespace": "nginx"
          },
          "spec": {
            "replicas": 1,
            "template": {
              "metadata": {
                "annotations": {
                  "prometheus.io/path": "/status/format/prometheus",
                  "prometheus.io/port": "80",
                  "prometheus.io/scrape": "true"
                },
                "labels": {
                  "app": "nginx-server"
                }
              },
              "spec": {
                "affinity": {
                  "podAntiAffinity": {
                    "preferredDuringSchedulingIgnoredDuringExecution": [
                      {
                        "podAffinityTerm": {
                          "labelSelector": {
                            "matchExpressions": [
                              {
                                "key": "app",
                                "operator": "In",
                                "values": [
                                  "nginx-server"
                                ]
                              }
                            ]
                          },
                          "topologyKey": "kubernetes.io/hostname"
                        },
                        "weight": 100
                      }
                    ]
                  }
                },
                "containers": [
                  {
                    "image": "vaibhavthakur/nginx-demo:${trigger.properties['TAG']}",
                    "imagePullPolicy": "Always",
                    "name": "nginx-demo",
                    "ports": [
                      {
                        "containerPort": 80,
                        "name": "http"
                      }
                    ],
                    "resources": {
                      "limits": {
                        "cpu": "2500m"
                      },
                      "requests": {
                        "cpu": "2000m"
                      }
                    }
                  }
                ]
              }
            }
          }
        }
      ],
      "moniker": {
        "app": "nginx"
      },
      "name": "Deploy (Manifest)",
      "refId": "5",
      "relationships": {
        "loadBalancers": [],
        "securityGroups": []
      },
      "requisiteStageRefIds": [
        "4"
      ],
      "source": "text",
      "stageEnabled": {
        "expression": "\"${trigger.properties['ACTION']}\" == \"DEPLOY\"",
        "type": "expression"
      },
      "type": "deployManifest"
    },
    {
      "failPipeline": true,
      "instructions": "Please approve if staging looks good.",
      "judgmentInputs": [],
      "name": "Manual Judgment",
      "notifications": [],
      "refId": "6",
      "requisiteStageRefIds": [
        "3"
      ],
      "stageEnabled": {
        "expression": "\"${trigger.properties['ACTION']}\" == \"PATCH\"",
        "type": "expression"
      },
      "type": "manualJudgment"
    },
    {
      "account": "k8-staging-1",
      "cloudProvider": "kubernetes",
      "kind": "deployment",
      "location": "nginx",
      "manifestName": "deployment nginx-deployment",
      "name": "Patch (Manifest)",
      "options": {
        "mergeStrategy": "strategic",
        "record": true
      },
      "patchBody": {
        "spec": {
          "template": {
            "spec": {
              "containers": [
                {
                  "image": "vaibhavthakur/nginx-demo:${trigger.properties['TAG']}",
                  "name": "nginx-demo"
                }
              ]
            }
          }
        }
      },
      "refId": "7",
      "requisiteStageRefIds": [
        "6"
      ],
      "source": "text",
      "stageEnabled": {
        "expression": "\"${trigger.properties['ACTION']}\" == \"PATCH\"",
        "type": "expression"
      },
      "type": "patchManifest"
    }
  ],
  "triggers": [
    {
      "enabled": true,
      "expectedArtifactIds": [],
      "job": "<JENKINS-JOB-NAME>",
      "master": "<JENKINS-ENDPOINT>",
      "propertyFile": "trigger.properties",
      "type": "jenkins"
    }
  ],
  "updateTs": "1549950567155"
}
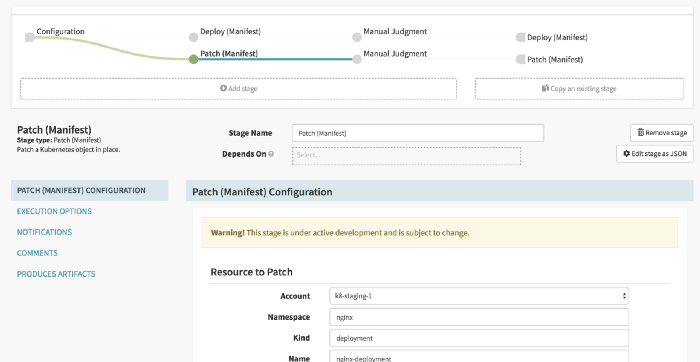
- Once you add it, the pipeline will look something like this. We have different pipelines for deploying a new release and patching an existing revision with the image tag.

If you notice carefully this single pipeline triggers deployment to Staging and Production env and each of those deploys could be DEPLOY action or PATCH action. In short, one pipeline is offering 4 different options (Deploy Staging, Patch Staging, Deploy Prod and Patch Prod). This is very basic and you can easily extend this to achieve more complex actions depending upon your use case.
Deep Diving Into the Pipeline
- Configuration: This is the stage where you mention the Jenkins endpoint, the job name and expected artifact from the job. In our case: trigger.properties. Make sure that the Jenkins endpoint is accessible from Spinnaker and auth free. If your Jenkins is deployed in the same Kubernetes cluster as Spinnaker then you can also use Jenkins ClusterIP service endpoint.
- Deploy (Manifest): The trigger.properties file has an action variable based on which we decide whether we need to trigger a new deployment for the new image tag we can patch an existing deployment. The properties file also tells which version to deploy of patch with. It is set in the TAG variable.
Please keep in mind that tigger.properties file and pipeline expressions are not available in the Configuration stage of the Job. They become available in the subsequent stages. The new deployment occurs in accordance with the maxSurge and maxUnavailable setting in the deployment manifest. We have already gone over this in detail in this blog.
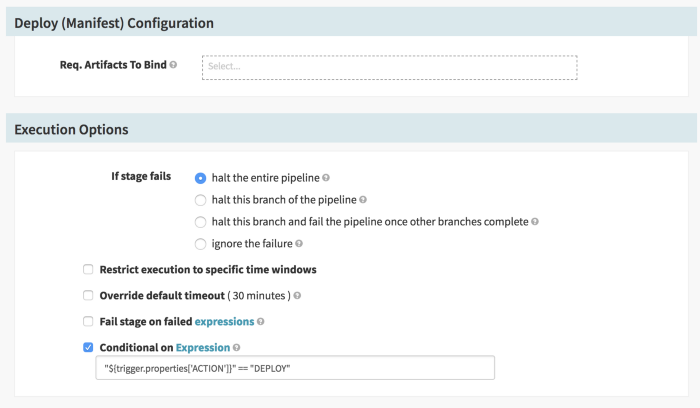
- Patch (Manifest): Similar to the Deploy stage, this stage will check the same variable and if it evaluates to “PATCH”, then the current deployment will be patched. It should be noted that in both these stages the Kubernetes cluster is being used as a staging cluster.
Therefore, our deployments/patches for the staging environment will be automatic. In order to make the development process faster we enable automatic deployments to Dev/Staging/QA environments however all Production deploys are strictly upon approval.
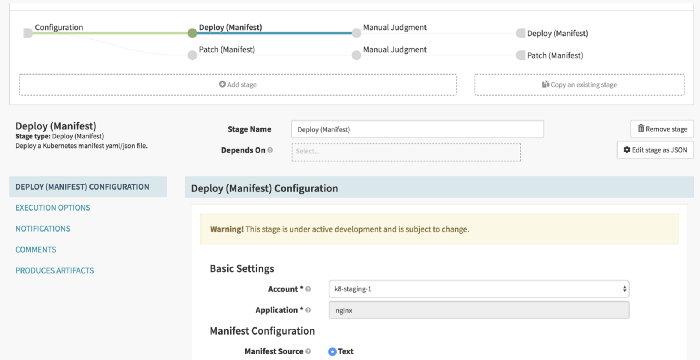
- Manual Judgement: This is a very important stage. It is here where you decide whether or not you want to promote the currently running build in the staging cluster to the production cluster. This should be approved only when the staging build has been thoroughly tested by various stakeholders. The stakeholders who should be allowed to approve this stage can also be relayed using the trigger.properties file from Jenkins.
- Deploy(Manifest) and Patch(Manifest): The final stages in both paths are similar to their counterparts in pre-approval stages. The only difference being that the cluster under Account is a production kubernetes cluster.
- One important thing to remember is that we can configure Notifications for the entire pipeline or individual stages. It largely depends on how verbose you want to make the pipeline. However, it is important that we configure notifications for the Manual Judgement stage so that stakeholders are notified when an approval is needed. These notifications can be email alerts or simple slack/hipchat messages. Slack or Hipchat is of course the recommended way.
Now you are ready to push out releases for your app. Once Triggered, the pipeline will look like this:
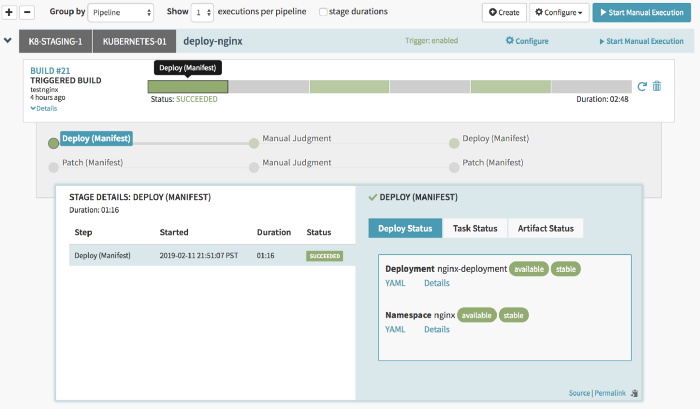
This pipeline gets triggered when the Jenkins build completes. However, Spinnaker offers a manual execution option (top right in the image) using which you can trigger the pipeline using the Spinnaker dashboard. Each manual trigger refers to a Jenkins build which should have been previously completed since it needs to consume the artifacts file from the build.
If you want to take a look at the actual yaml file which was deployed to the cluster just click on the YAML button as shown in the screenshot above.
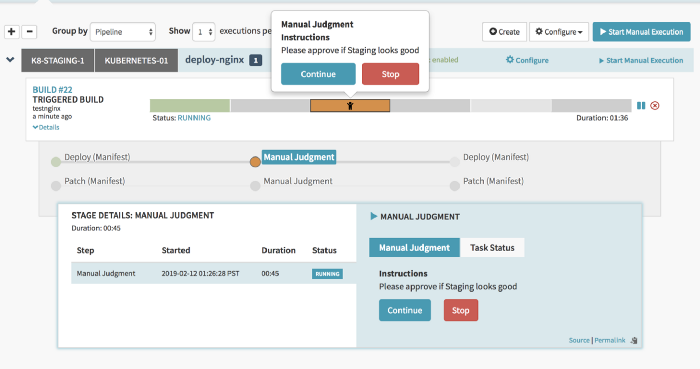
As soon as you will click on Continue the job will proceed to the next stage.
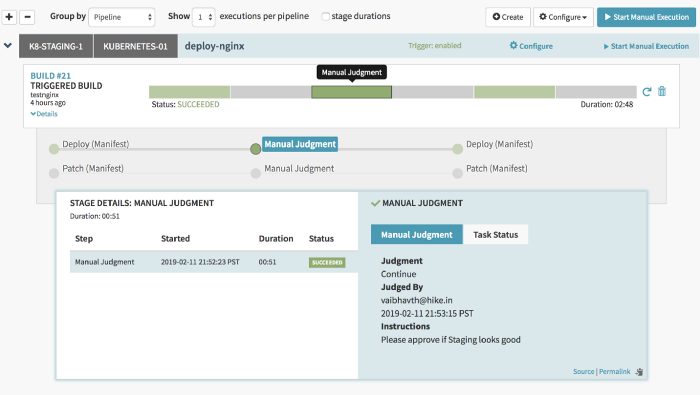
After the approval has been granted we can see which stakeholder approved the build. It is very handy for audit purposes.
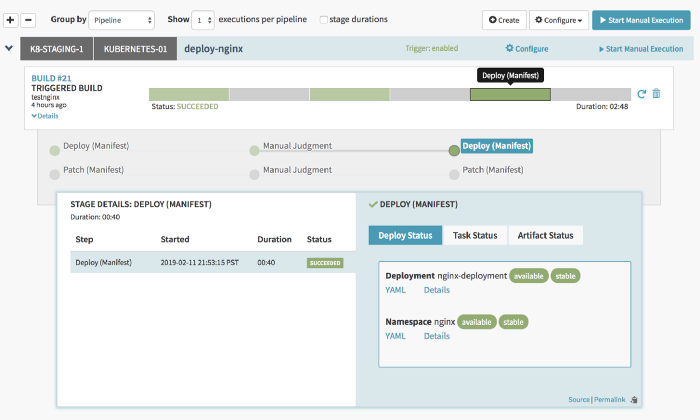
The sections in Grey color have been skipped because the ACTION variable did not evaluate “PATCH”. Once you deploy, you can view the current version and also the previous versions under the Infrastructure Section.
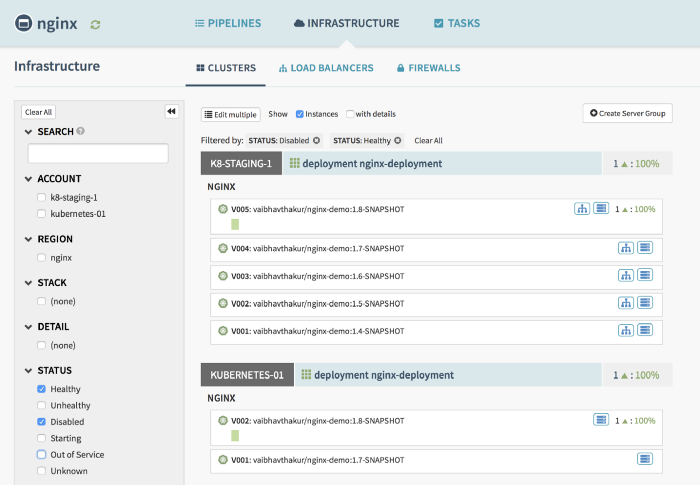
Under the Infrastructure view you can see all the services running in all your clusters. This is where you can
- Interactively edit the manifests
- View logs from a particular pod or just
- Select a previously deployed version and trigger a roll-back to it
- Scale up or Scale down an existing deployment.
Some Important Points to Remember:
- You can emit as much data as you feel like to the properties file and later consume it in a Spinnaker pipeline. This can also paths for any additional artifacts or notification URLs.
- You can also trigger other Jenkins jobs from Spinnaker and then consume its artifacts in the subsequent stages. Spinnaker uses Jenkins as a sandbox to run script stages and this provides a great deal of flexibility to accomplish all kinds of build tasks.
- Spinnaker is a very powerful tool and you can perform all kinds of actions like roll-backs, scaling, etc. right from the console. You can also view pod logs and deployment manifests right from the dashboard. This makes Spinnaker a single pane of glass where you can manage all of your Kubernetes resources.
- Not only deployments but all kinds of Kubernetes resources can be managed using Spinnaker.
- Spinnaker provides excellent integration with Slack/Hipchat/Email for pipeline notifications.
Conclusion
In this blog, we implemented a complete CI/CD pipeline using Jenkins and Spinnaker which you use and start deploying to your Kubernetes clusters. Installing Spinnaker is extremely easy and adding new clusters is even easier. Let us know if you need help installing Spinnaker in your infrastructure.
Spinnaker provides excellent integrations with Helm, Prometheus etc. It also allows you to do Canary releases by getting Prometheus metrics right in the dashboard. All kinds of complex scenarios can be accomplished using Spinnaker.
If you need help designing a custom CI/CD pipeline feel free to reach out to myself through LinkedIn. Additionally, MetricFire can help you monitor your applications across various environments and different stages during the CI/CD process. Monitoring is extremely essential for any application stack, and you can get started with your monitoring using MetricFire’s free trial.
Robust monitoring and a well designed CI/CD system will not only help you meet SLA’s for your application but also ensure a sound sleep for the operations and development teams. If you would like to learn more about it please book a demo with us


